Guides · Self-custody
Set up a SeedSigner with Sparrow
Short answer: Build a stateless SeedSigner from parts, flash verified firmware, make a dice seed, and sign Sparrow transactions by QR only.
A small device that keeps your keys offline. It talks to your computer only through QR codes. No soldering needed. You can do it in four sittings, and stop between them.
Printed from few.guide.
What you need5 items
- A SeedSigner, or its partsStep 2 has the shopping list. No soldering needed.
- A computer with a webcamWindows, macOS or Linux. Laptops have a webcam. A desktop needs a USB webcam.
- A microSD card and a card readerAny small card works. Most laptops need a cheap USB card reader.
- A 6-sided die, pencil and paperFor your 24 words. Later, a steel backup plate (optional).
- A little bitcoin on an exchangeFor a small test, often 20–50 USD worth.
Pick how you get your device
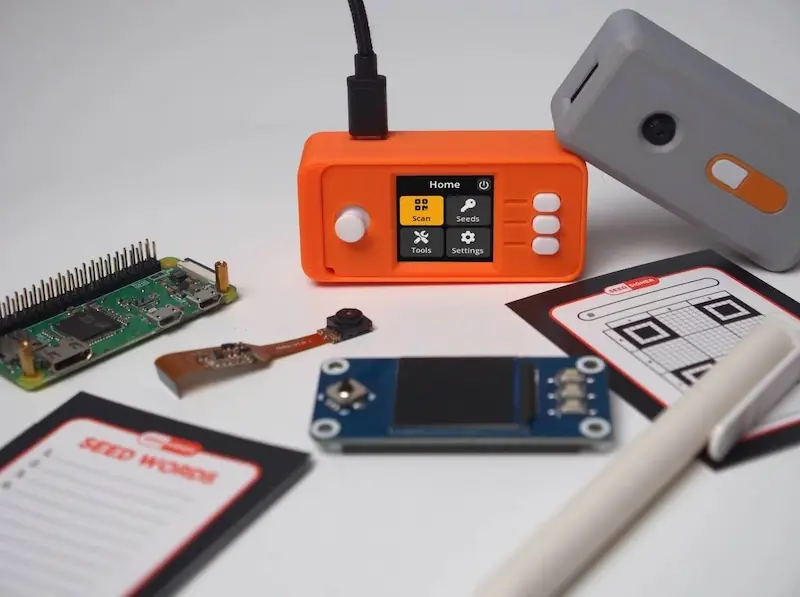
A SeedSigner is a tiny Raspberry Pi computer with a screen and a camera. It holds your keys only while it is on. When you switch it off, it forgets them.
Not sure? Do this.
Buy a ready-made SeedSigner or a complete kit with the pins already on. See the parts tracker. No tools, no soldering. You still put the software on it yourself, and you make your own seed.
Already built. Skip to step 4 when it arrives.
A board with the 40 pins already attached. The screen just presses on. About 15 minutes.
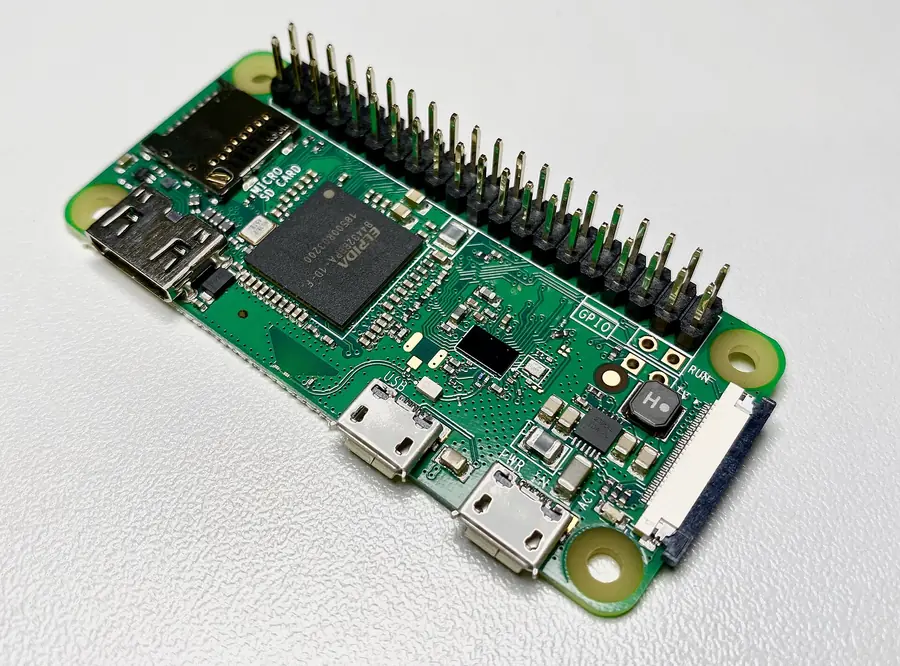
A board without pins? A phone repair shop can solder them in a few minutes.
The guide comes in four parts. Each one ends with a good place to pause:
| Part | Steps | Time |
|---|---|---|
| Get the device | 1–3 | 15–30 minutes, plus delivery |
| Set up the computer | 4–8 | 45–60 minutes |
| Make and test your seed | 9–14 | About 1 hour |
| Your first bitcoin | 15–19 | 30–60 minutes, plus waiting |
Is this normal? Yes: you will type your 24 words into the device each time you use it. That is how it stays empty. Step 14 shows a faster way and its catch.
Get the parts
Buying parts yourself? This is the whole list. If a kit has all of it, you only need the card reader and a webcam.
- Raspberry Pi Zero 2 WHThe best pick: fast and the pins are already on. A Pi Zero WH (slower) also works. “W” means it has Wi-Fi, but SeedSigner never turns it on.
- 1.3-inch LCD HAT, 240×240 pixelsThe screen with a joystick and 3 buttons. “HAT” just means an add-on board that presses onto the pins. The SeedSigner project lists the Waveshare 1.3" model. Check it says 240×240.
- Pi Zero camera, OV5647 sensorMust come with the short, narrow “Zero” ribbon cable. Bigger Pi cameras have a wider cable that won’t fit.
- microSD cardAny size, any brand. 8 or 16 GB is easy to find. The software is only 50 MB.
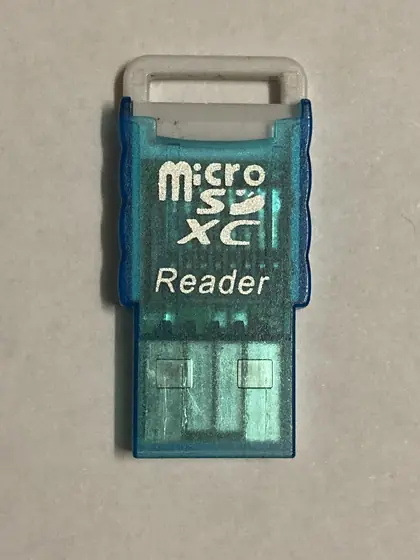
- USB microSD card readerOnly if your computer has no microSD slot. It plugs into your computer, not the SeedSigner. A few dollars.
- Micro-USB cable and a USB chargerAn old phone charger or a power bank is fine.
- WebcamYour laptop’s webcam works. A desktop needs any USB webcam.
- A case (optional)Free 3D-printable designs are in the SeedSigner project.
.jpeg)

Bought a ready-made unit? Skip to step 4.
Put it together
About 15 minutes. These parts are tougher than they look. Go slowly, and nothing will break.
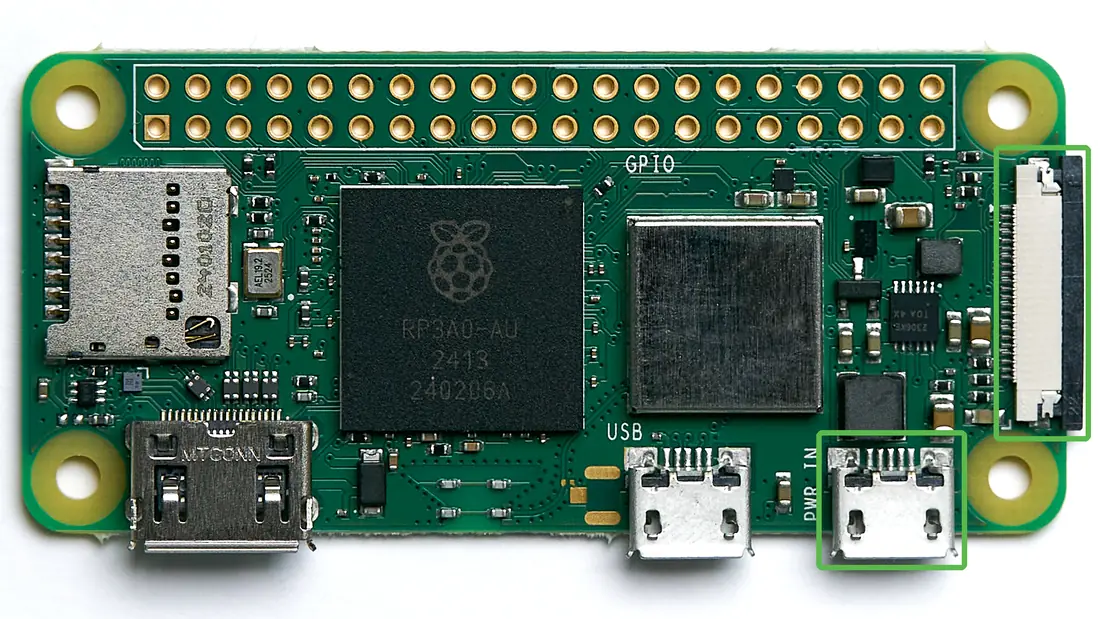

- Unplug everything. Hold the boards by their edges.
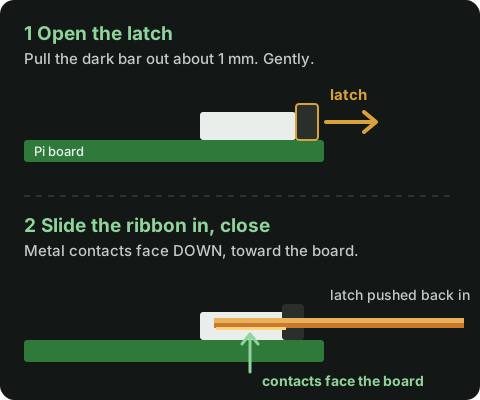
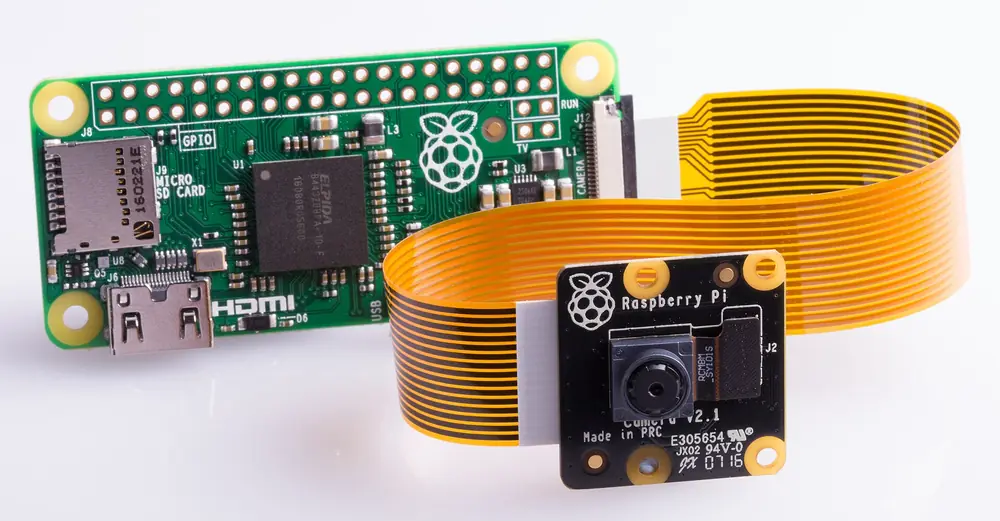
- Find the thin camera connector on the Pi’s short edge. Gently pull its dark bar (the latch) out about 1 mm. It slides; it does not come off.
- Slide the camera ribbon in, as far as it goes, with the metal contacts facing down toward the board. Push the latch back in. The ribbon should not move when you tug lightly.
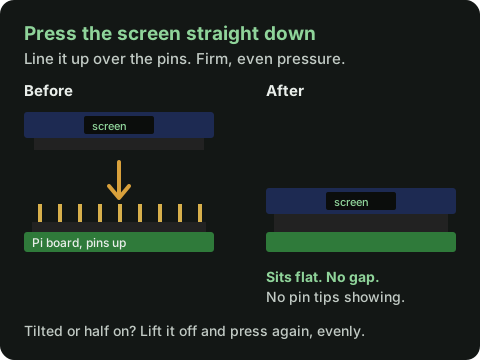
- Line the screen up over the Pi so it covers the board. Press it straight down onto the pins with firm, even pressure, like closing a tight lid, until it sits flat.
- Don’t power it on yet.
.jpg)
Not your thing? A phone repair shop can do this in minutes. Or buy one ready-made.
Good place to pause. Your device is built. The next part is on your computer.
Install Sparrow on your computer
Sparrow Wallet is free software. It shows your balance and prepares payments. It never sees your 24 words.
- Type sparrowwallet.com into your browser yourself, then open Download. Or use this link.
- Download the file for your computer: .msi for Windows, .dmg for Mac (Apple M-series or Intel), .deb for Ubuntu or Debian.
- Also download the two small files at the bottom of the list: the Manifest and the Manifest Signature. Keep all three in your Downloads folder.
- Don’t open the installer yet. First, step 5 checks it is the real one.
Is this normal? The file names have a version number, like 2.5.5. Yours may be newer. That’s fine.
Make sure Sparrow is the real one
Why this matters. Fake wallet apps exist, and they steal bitcoin. This check proves your download came from Sparrow’s developer and was not changed. It takes 10–15 minutes, once. After this, Sparrow checks other downloads for you.
You need a free tool called GPG: short for GNU Privacy Guard. Sparrow and SeedSigner sign their downloads with it, so it can check them.. Pick your computer. Wherever you see VERSION, type your version number, for example 2.5.5.
Windows
- Install Gpg4win (free). Keep the default options.
- Open your Downloads folder. Click the address bar, type cmd and press Enter. A black window opens in that folder.
- Copy and paste these lines, one at a time, and press Enter after each:
curl https://keybase.io/craigraw/pgp_keys.asc | gpg --import
gpg --verify sparrow-VERSION-manifest.txt.asc sparrow-VERSION-manifest.txt
- Look for Good signature from "Craig Raw". That is the line that matters.
- Now check the installer itself:
CertUtil -hashfile Sparrow-VERSION.msi SHA256
- A long line of letters and numbers appears. Open sparrow-VERSION-manifest.txt in Notepad, press Ctrl+F and paste the first 8 characters. The line found must end with your file name, and the whole code must match.
Mac
- Install GPG Suite (free).
- Open the Terminal app (press Cmd+Space, type Terminal). Type cd Downloads and press Enter.
- Copy and paste these lines, one at a time:
curl https://keybase.io/craigraw/pgp_keys.asc | gpg --import
gpg --verify sparrow-VERSION-manifest.txt.asc sparrow-VERSION-manifest.txt
shasum --check sparrow-VERSION-manifest.txt --ignore-missing
- Look for Good signature from "Craig Raw".
- The last command must show your file name followed by : OK.
Linux
- GPG is already installed. Open a terminal in your Downloads folder.
- Run these lines, one at a time:
curl https://keybase.io/craigraw/pgp_keys.asc | gpg --import
gpg --verify sparrow-VERSION-manifest.txt.asc sparrow-VERSION-manifest.txt
sha256sum --check sparrow-VERSION-manifest.txt --ignore-missing
- Look for Good signature from "Craig Raw".
- The last command must show your file name followed by : OK.
Is this normal? You may also see WARNING: This key is not certified with a trusted signature. That is normal. It only means you haven’t marked the key as trusted in GPG yourself. What matters is “Good signature from Craig Raw”. For extra care, the key ID shown should end in 4C67 4B40, as listed on keybase.io/craigraw.
“BAD signature”, or the codes don’t match? Stop. Delete the files, download them again from sparrowwallet.com, and repeat. Don’t install a file that fails.
- All good? Install and open Sparrow.
- When Sparrow asks about a server: a computer that knows the whole bitcoin history. Sparrow asks it about your addresses., choose Public Server. That’s fine to start.
A public server can see which addresses you look up. Later, you can run your own node to keep that private.
Download the SeedSigner software
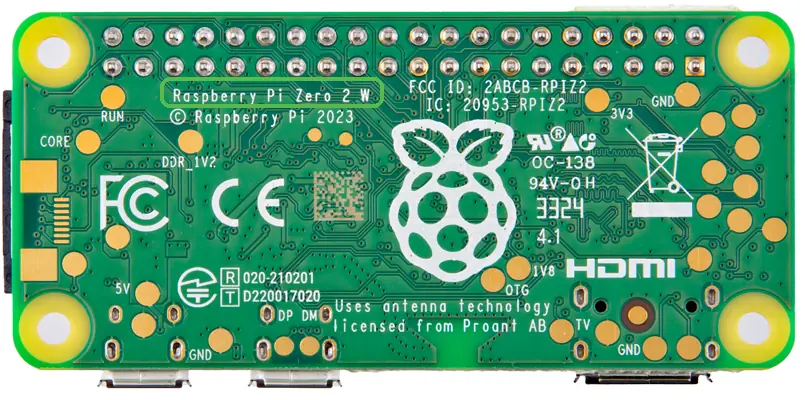
First, find out which board you have. The model name is printed on the back of the board, or on the box.

| Your board says | Download this file |
|---|---|
| Raspberry Pi Zero 2 W (or 2 WH) | seedsigner_os.VERSION.pi02w.img |
| Raspberry Pi Zero W, WH or v1.3 | seedsigner_os.VERSION.pi0.img |
- Go to the SeedSigner releases page. The newest release is at the top (0.8.7 when this was written).
- Scroll to Assets under it. If you see only a few lines, click Assets to show all the files.
- Download your .img file: the SeedSigner software, packed as one file that you copy onto the card. Some people call it firmware. from the table above.
- Download two more files into the same folder: seedsigner.VERSION.sha256.txt and seedsigner.VERSION.sha256.txt.sig.
What are those? The .txt file lists a fingerprint of each release file. The .sig file is a signature: made with a private key only the developers hold. If anyone changes the file, the check fails. that proves the SeedSigner team made that list.
Check the download with Sparrow
Now Sparrow does the checking for you. No commands.
- In Sparrow, open Tools → Verify Download. Or drag one of the three files onto Sparrow.
- For the signature, choose the .sig file. Sparrow usually finds the other two. If not, browse to the .txt and .img files.
- You want three green ticks, and “signed by” SeedSigner.
- If Sparrow asks for a public key, download SeedSigner’s public key and select it.
Red or failed? Stop. Delete the files and download them again. Never write a file that fails the check.
Prefer the terminal? Show commands
# import the SeedSigner project key
gpg --fetch-keys https://keybase.io/seedsigner/pgp_keys.asc
# must say "Good signature"
gpg --verify seedsigner.VERSION.sha256.txt.sig
# must end in ": OK"
shasum -a 256 --ignore-missing --check seedsigner.VERSION.sha256.txt
Then match the last 16 characters of the key fingerprint with keybase.io/seedsigner. On Windows, follow the SeedSigner README.
Write the microSD card
- Put the card in your card reader and plug it in.
- Install and open Raspberry Pi Imager (free). It’s the first choice on Windows. balenaEtcher also works.
- If Imager asks for a device, pick your Pi model or No filtering. For the system, scroll down to Use custom and pick your checked .img file.
- Choose your card. Double-check it’s the card, not another drive. Then write.
- If Imager offers to customise settings, say no.
- Wait until it finishes and verifies. It’s quick, under a minute. Then eject the card.
Is this normal? After writing, your computer may show the card as a small drive. Don’t put files on it. If any window asks to format the card, click Cancel. Writing failed or got stuck on Windows? Right-click Imager, choose Run as administrator, and try again.
The card isn’t special. If anything goes wrong, you can write it again.
Switch it on
- Slide the card into the Pi’s card slot, label up.
- Plug the cable into the micro-USB port marked PWR IN, the one nearest the corner. The other port is for data and won’t power it.
- Wait up to a minute. You’ll see the main menu: Scan, Seeds, Tools, Settings.
- Move with the joystick. Press the joystick in to select. The three small buttons are shortcuts.
Is this normal? A black or white screen for up to a minute is normal while it starts. Still blank after two minutes? Check the screen is pressed all the way down, then the card.
Stateless SeedSigner forgets everything when the power goes off. That’s on purpose: no keys are stored on it.
Good place to pause. Your computer and device are ready. The next part needs about an hour, in a private place.
Make your seed with dice
Your seed: also called a recovery phrase or seed phrase. Anyone who sees it can take your bitcoin. is a list of 24 words. It is the master key to your bitcoin. Set aside 30 minutes. Have a die, a pencil and paper ready.
Why this matters. These 24 words are your bitcoin. The device can be lost and replaced. The words can’t. Making them with real dice means nobody, not even the device maker, can guess them.
- Go somewhere private. No phones, cameras or smart speakers pointed at you.
- On the SeedSigner: Tools → New seed (dice icon) → 24 words (99 rolls).
- Roll a real die 99 times. Enter each result. Don’t make numbers up: people are bad at random. It takes 15–25 minutes.
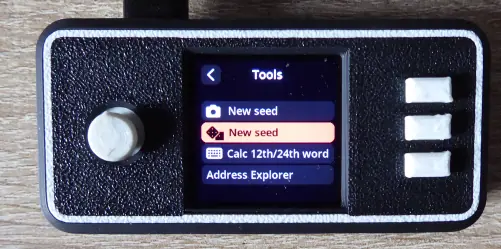
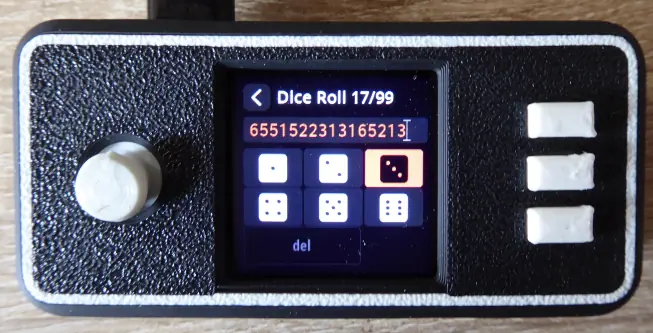
Is this normal? Entered a wrong number? Select del on the keypad. It removes the last roll. The counter goes back by one.
Want to pick the words yourself with dice and let SeedSigner add only the last word? See the dice seed guide. For a first time, this step is simpler.
Write down and check your words
- SeedSigner shows the words a few at a time. Write each one on paper, numbered 1 to 24, in clear block letters.
- Choose Verify and answer the short quiz. It checks you copied them right.
- Next you see the fingerprint: Sparrow shows the same 8 characters later, so you can check both use the same seed.. Write it next to your words.
- The passphrase: an extra word added to your 24 words. Each passphrase opens a different wallet, so a typo opens an empty one. option: skip it for now and choose Done.
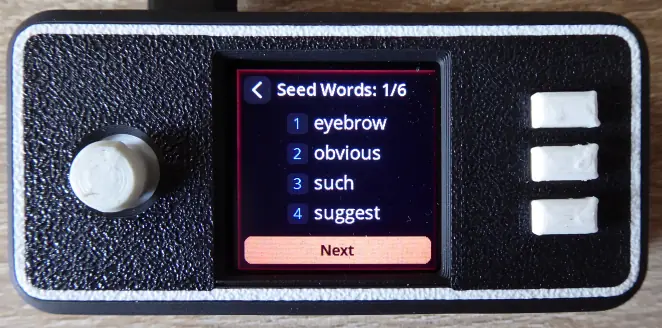
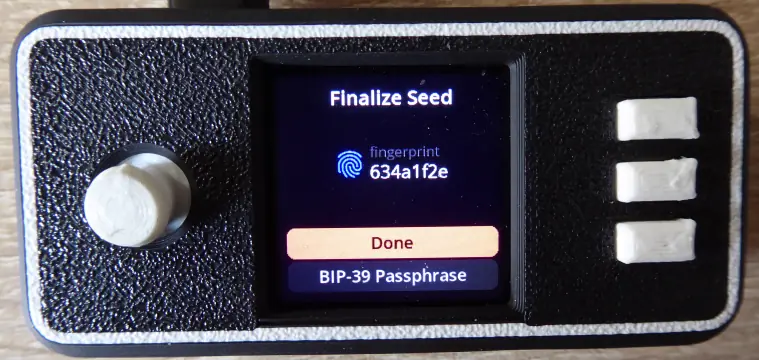
Skipping the passphrase is fine for most people. It’s an extra lock, but also a new way to lose access.
Keep the words to yourself. Never photograph them. Never type them into a phone, computer or website. Keep the paper somewhere only you can reach, away from water and fire.
Send your public key to Sparrow
Now you give Sparrow your public key, the xpub: short for extended public key. From it, Sparrow can work out all your addresses.. Nothing can be spent on these screens.
- Keep the SeedSigner on.
- Pick exactly these: Seeds → your fingerprint → Export Xpub → Single Sig → Native Segwit. They are the normal, modern choices.
- If asked for a QR format, keep the first one.
- Read the notice, then an animated QR code appears. Leave it on screen.
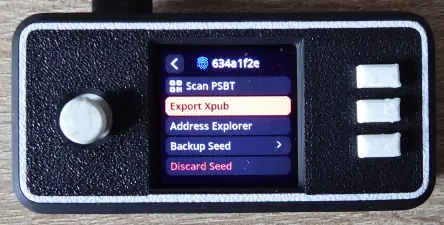
What they mean: Single Sig: one key signs. The normal choice. “Multisig” needs several keys. · Native Segwit: the modern address type. Addresses start with bc1q. Lower fees..
The xpub can’t spend. Keep it private anyway: it shows all your addresses and balance.
Add the wallet to Sparrow
- File → New Wallet. Give it a name.
- Click Airgapped Hardware Wallet. Next to SeedSigner, click Scan….
- Hold the SeedSigner 15–20 cm from your webcam. If it struggles, move the joystick up or down to change the QR brightness.
- Check what Sparrow filled in: Single Signature and Native Segwit.
- Click Apply. Set a password. It protects the wallet file on this computer, not your bitcoin.
- Check the master fingerprint in Sparrow matches the one you wrote down.
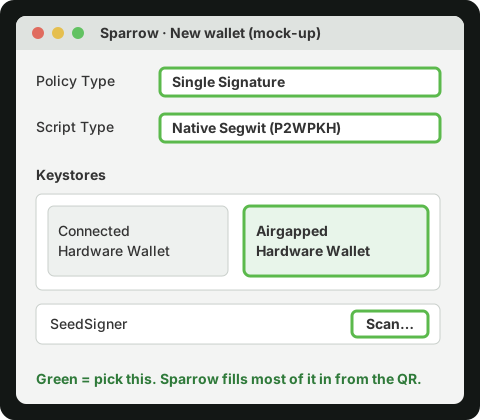
The SeedSigner is airgapped: no cable and no wireless link to other devices. Data moves only by QR code.: it never plugs into the computer.
Is this normal? Scanning takes a few seconds. Hold still, avoid glare, and try a little closer or further away.
Test your backup now
Do this before any bitcoin goes in. About 5–10 minutes.
- Unplug the SeedSigner. Its memory is wiped.
- Plug it back in: Seeds → Enter 24-word seed. Type the words from your paper.
- The fingerprint must match Sparrow’s. Then your backup works.
Is this normal? Typing is faster than it looks. As you type, only letters that can still make a real word stay active, and matching words appear on the right. Usually 3–4 letters are enough. Then pick the word.
No match? A word is wrong or out of order. Fix it now, while the wallet is empty.
A faster way: SeedQR (optional)
SeedSigner can turn your words into a SeedQR: a QR code you copy by hand onto a grid card. Next time, you scan it instead of typing. Find it under Seeds → your seed → Backup Seed → Export as SeedQR.
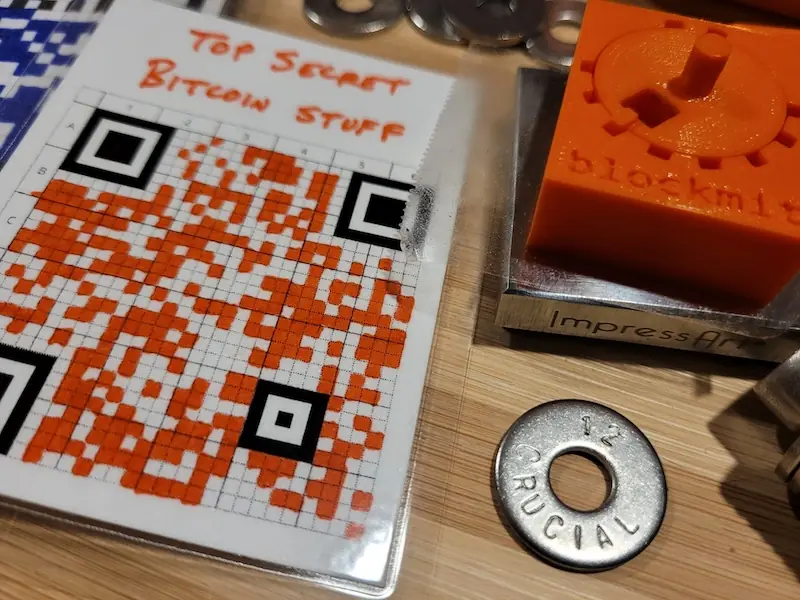
The catch: the SeedQR is your seed. Anyone who scans it has your bitcoin. Protect it exactly like the words, and never photograph it or scan it with a phone.
Good place to pause. Your seed works and your backup is tested. Next: your first bitcoin.
Check a receive address on the device
- In Sparrow, open the Receive tab. It shows an address and a QR code.
- On the SeedSigner, enter your words (or scan your SeedQR) if it was off.
- Choose Scan and scan Sparrow’s QR. Pick your seed.
- It confirms the address belongs to your seed.
Do this before every payment in that you’d hate to lose. It proves your computer didn’t swap the address.
Withdraw a small amount from your exchange
Now move a little bitcoin from your exchange to your new wallet. Start small: often 20–50 USD worth, enough to cover the exchange’s minimum and fee.
- In Sparrow, copy the address you just checked.
- On your exchange, choose Withdraw (sometimes Send) and pick bitcoin (BTC).
- For the network, choose Bitcoin. Not Lightning, BEP20 or any other.
- Paste the address. Check the first 6 and last 6 characters match Sparrow.
- Enter the amount and confirm. Your exchange may ask for a 2FA code or an email confirmation.
Network matters. Only the Bitcoin network sends to this address. Other networks can lose the money.
- The payment shows in Sparrow under Transactions. First as unconfirmed.
- Wait for one confirmation: your payment was written into a block. Each new block adds one more.. Usually 10–60 minutes after the exchange sends it.
Is this normal? Some exchanges take a few hours, or hold a first withdrawal to a new address for a day. That’s on their side. Your address is fine.
The exchange will know this address belongs to you. That’s expected for now.
Create a test send to yourself
Why this matters. A test send proves you can actually spend from this wallet, before you trust it with more. It costs a small fee. Worth it.
- In Sparrow, open Receive and copy your next address.
- Open Send. Paste that address and enter a small amount.
- Pick a fee rate: what you pay miners, in sats per vbyte (sat/vB). Higher = faster.. Not in a hurry? Pick the lower suggestion. See the fee weather for today’s fees.
- Create Transaction → Finalize Transaction for Signing → Show QR.
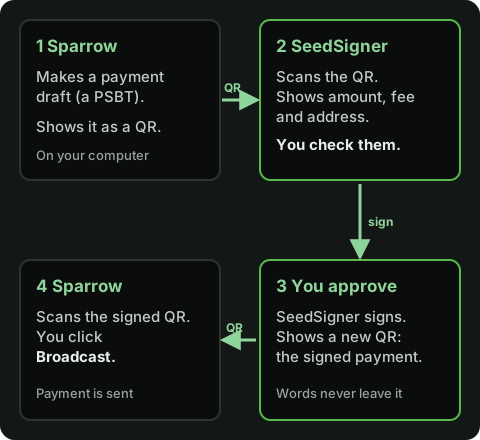
Sparrow now shows a PSBT: short for partially signed bitcoin transaction. A standard format most wallets can read. as a QR code. It does nothing until your SeedSigner signs it.
Sign on the SeedSigner and send
- If the SeedSigner was off, enter your words (or scan your SeedQR).
- Choose Scan and scan Sparrow’s QR code. Pick your seed.
- Read the amount, fee and address on the SeedSigner screen. If all is right, choose Approve transaction.
- A signed QR code appears. In Sparrow click Scan QR and hold the device to the webcam.
- Click Broadcast Transaction to broadcast: send the signed payment to the bitcoin network. it.
Is this normal? You may see a second amount going to your own wallet. That’s change: bitcoin is spent in whole coins, like paying with a banknote. The difference goes to a new address in your wallet.: the rest of the coin coming back to you. In a send to yourself, both are yours.
Always read the small screen. It’s the one screen malware on your computer can’t change. If the address there doesn’t match what you meant, don’t approve.
You’re set
You did it. Your bitcoin is now yours, not the exchange’s.
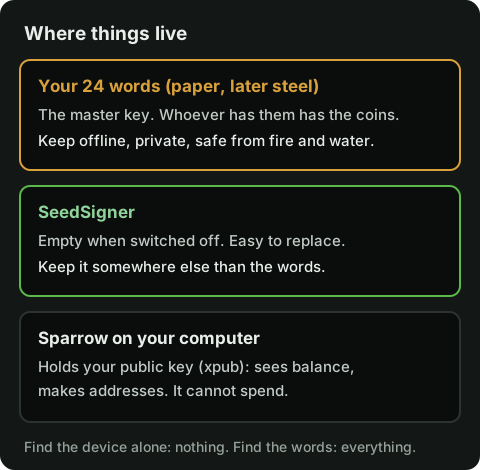
- Keep your words and your SeedSigner in different places. Someone who finds the device alone gets nothing. Someone who finds the words gets everything.
- Each use: power on, enter words (or scan your SeedQR), scan, check, sign, power off.
- Later, copy your words onto steel. See steel backups.
- Next steps: run your own node. A multisig guide is coming.
Get new guides and parts alerts.
One email when it matters. No tracking.
Thanks — check your inbox to confirm. Buttondown, our email service, opened in a new tab. If it asks you to verify, finish that step there first.
Sent by Buttondown. Your email is used only for these updates. Unsubscribe any time.
Sources16
- SeedSigner README: parts, download, verify, flash (incl. Windows tips)
- SeedSigner releases: v0.8.7 files and board images
- SeedSigner 0.8.7 source: dice entry with delete key, word entry with matching words, Export Xpub and SeedQR menus
- SeedQR format
- seedsigner.com: hardware and sellers
- Raspberry Pi: Zero 2 W, with or without headers
- Raspberry Pi Imager
- Sparrow download and verification (Windows, macOS, Linux)
- Craig Raw’s signing key
- Sparrow: airgapped wallet with QR codes
- Images: SeedSigner project photos and screens (MIT License)
- Image: Pi Zero 2 W top, Anil Öztas, CC BY 4.0 (boxes added)
- Image: Pi Zero 2 WH back, SparkFun Electronics, CC BY 2.0 (cropped, box added)
- Image: Pi Zero WH, Ubahnverleih, CC0
- Image: microSD reader, DraftSaturn15, CC BY 4.0
- Image: Pi Zero with camera ribbon, Raspberry Pi Foundation, CC BY-SA 4.0
Menus, dice and word entry checked against SeedSigner 0.8.7 source. Verification steps checked against the Sparrow 2.5.5 download page. October 12, 2026.
Use ← → to move between steps. Progress is saved in this browser only.